1 - gdm3和lightdm切换
# 切换 gdm3
sudo dpkg-reconfigure gdm3

# 切换 lightdm
sudo dpkg-reconfigure lightdm
2 - netplan
-
在 Ubuntu20.04 版本中使用 netplan 管理网络
-
在安装好的 Ubuntu20.04 中没有 networking 和 NetworkManage 服务
-
netplan 配置文件:/etc/netplan/*.yaml ,文件名每个不一样
-
netplan 说明文件: /usr/share/doc/netplan/example/ 目录下,在该目录下有各种样例文件,可以提供帮助
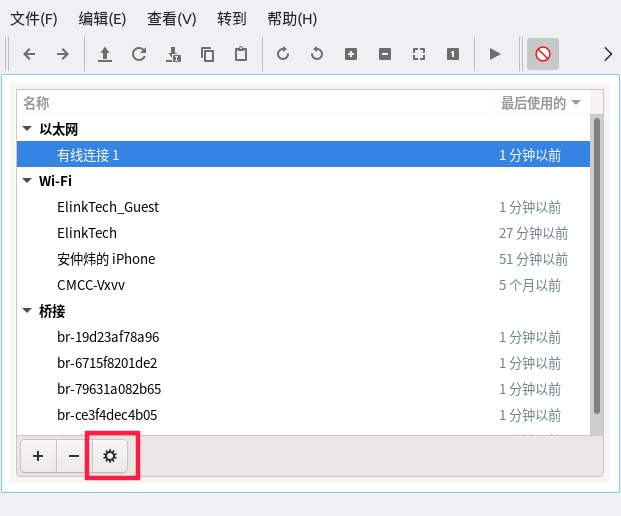
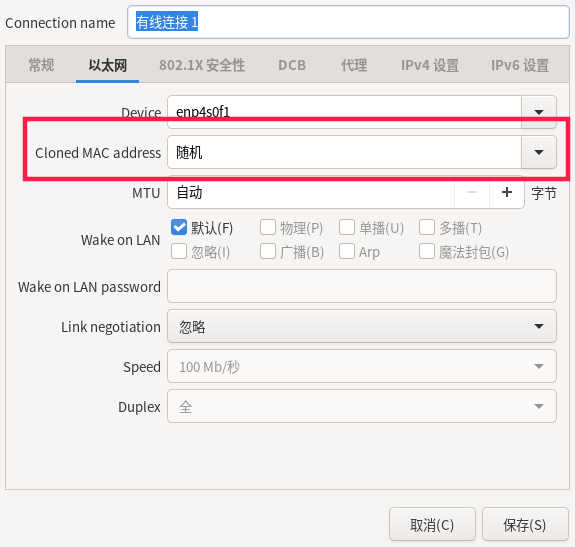
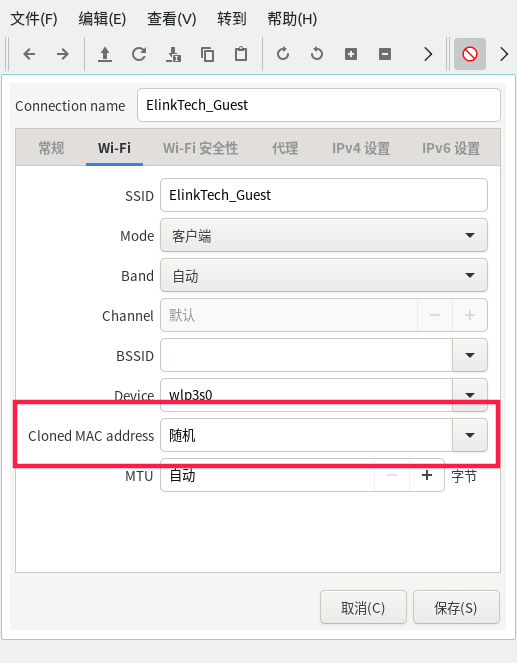
3 - Ubuntu桌面版设置随机Mac地址
-
首先右键单击network-manager管理工具,点左键 Edit Connections
-
点选要配置的连接,点下面的齿轮
-
红框位置选随机, 保存即可
4 - 报错处理
由于没有公钥,无法验证下列签名
W: GPG 错误:http://ppa.launchpad.net precise Release: 由于没有公钥,无法验证下列签名: NO_PUBKEY 6AF0E1940624A220
W: 无法下载 bzip2:/var/lib/apt/lists/partial/mirrors.163.com_ubuntu_dists_precise_main_binary-i386_Packages Hash 校验和不符
sudo apt-key adv --keyserver keyserver.ubuntu.com --recv-keys 6AF0E1940624A220 #此处6AF0E1940624A220需要是错误提示的key
ssh无法连接到外网Linux主机
场景描述:
内网Linux主机ssh连接正常,不能ssh连接外网Linux
telnet 外网IP 22 通,ping命令通
此时可以试试以下方法
koala@koala:~$ ssh root@domain.com
(等待很久)Connection closed by xx.xx.xx.xx port 22

koala@koala:~$ ssh -v root@domain.com
OpenSSH_8.4p1, OpenSSL 1.1.1f  31 Mar 2020
debug1: Reading configuration data /usr/local/etc/ssh_config
debug1: Authenticator provider $SSH_SK_PROVIDER did not resolve; disabling
debug1: Connecting to domain.com [xx.xx.xx.xx] port 22.
debug1: Connection established.
debug1: identity file /home/koala/.ssh/id_rsa type 0
debug1: identity file /home/koala/.ssh/id_rsa-cert type -1
debug1: identity file /home/koala/.ssh/id_dsa type -1
debug1: identity file /home/koala/.ssh/id_dsa-cert type -1
debug1: identity file /home/koala/.ssh/id_ecdsa type -1
debug1: identity file /home/koala/.ssh/id_ecdsa-cert type -1
debug1: identity file /home/koala/.ssh/id_ecdsa_sk type -1
debug1: identity file /home/koala/.ssh/id_ecdsa_sk-cert type -1
debug1: identity file /home/koala/.ssh/id_ed25519 type -1
debug1: identity file /home/koala/.ssh/id_ed25519-cert type -1
debug1: identity file /home/koala/.ssh/id_ed25519_sk type -1
debug1: identity file /home/koala/.ssh/id_ed25519_sk-cert type -1
debug1: identity file /home/koala/.ssh/id_xmss type -1
debug1: identity file /home/koala/.ssh/id_xmss-cert type -1
debug1: Local version string SSH-2.0-OpenSSH_8.4
debug1: Remote protocol version 2.0, remote software version OpenSSH_7.4
debug1: match: OpenSSH_7.4 pat OpenSSH_7.0*,OpenSSH_7.1*,OpenSSH_7.2*,OpenSSH_7.3*,OpenSSH_7.4*,OpenSSH_7.5*,OpenSSH_7.6*,OpenSSH_7.7* compat 0x04000002
debug1: Authenticating to domain.com:22 as 'root'
debug1: SSH2_MSG_KEXINIT sent
debug1: SSH2_MSG_KEXINIT received
debug1: kex: algorithm: curve25519-sha256
debug1: kex: host key algorithm: ecdsa-sha2-nistp256
debug1: kex: server->client cipher: chacha20-poly1305@openssh.com MAC: <implicit> compression: none
debug1: kex: client->server cipher: chacha20-poly1305@openssh.com MAC: <implicit> compression: none
debug1: expecting SSH2_MSG_KEX_ECDH_REPLY
Connection closed by xx.xx.xx.xx port 22
此时查看本机mtu值
koala@koala:~$ netstat -i
Kernel Interface table
Iface      MTU    RX-OK RX-ERR RX-DRP RX-OVR    TX-OK TX-ERR TX-DRP TX-OVR Flg
br-19d23  1500        0      0      0 0             0      0      0      0 BMU
br-79631  1500        0      0      0 0           212      0      0      0 BMRU
docker0   1500        0      0      0 0             0      0      0      0 BMU
enp4s0f1  1500        0      0      0 0             0      0      0      0 BMU
lo       65536     1620      0      0 0          1620      0      0      0 LRU
veth9e8a  1500        0      0      0 0           239      0      0      0 BMRU
vmnet1    1500        0      0      0 0           222      0      0      0 BMRU
vmnet8    1500        0      0      0 0           223      0      0      0 BMRU
wlp3s0    1492    68412      0      0 0         23095      0      0      0 BMRU
测试mtu合理值
ping -s 1444 -M do baidu.com
#错误时
$ ping -s 1472 -M do baidu.com
PING baidu.com (220.181.38.148) 1472(1500) bytes of data.
ping: local error: message too long, mtu=1492
ping: local error: message too long, mtu=1492
ping: local error: message too long, mtu=1492
#正确时
$ ping -s 1464 -M do baidu.com
PING baidu.com (220.181.38.148) 1464(1492) bytes of data.
1452 比特,来自 220.181.38.148 (220.181.38.148): icmp_seq=1 ttl=52 时间=18.6 毫秒
1452 比特,来自 220.181.38.148 (220.181.38.148): icmp_seq=2 ttl=52 时间=18.2 毫秒
1452 比特,来自 220.181.38.148 (220.181.38.148): icmp_seq=3 ttl=52 时间=18.3 毫秒
1452 比特,来自 220.181.38.148 (220.181.38.148): icmp_seq=4 ttl=52 时间=18.2 毫秒
找到一个阈值, 1464(1492) 1492就是要设置本机mtu的值
设置mtu
#1、设置本机的mtu,即时生效,重启后失效
ifconfig eth0 mtu 1492 up #up可加可不加
#2、永久生效的修改方法,缺点是需要重启网卡
ubuntu 服务器是使用netplan管理网络不是networkmanager
#service network restart 重启网卡
tips: 一般以太网MTU都为1500, 在pppoe拨号路由中,会有8字节gre包装头,linux貌似是解析不了
ubuntu apt-get 错误 Temporary failure resolving ‘us.archive.ubuntu.com’ 解决
原因是dns没有配置,解决办法 加入dns服务器地址:
vi /etc/resolv.conf
5 - 替换清华源
Ubuntu24.04 以后 默认源在 /etc/apt/sources.list.d/ubuntu.list 文件里
https://mirrors4.tuna.tsinghua.edu.cn/help/ubuntu/
方式一 sed替换
sudo cp /etc/apt/sources.list /etc/apt/sources.list.bak
sudo sed -i "s@http://.*archive.ubuntu.com@https://mirrors.tuna.tsinghua.edu.cn@g" /etc/apt/sources.list
sudo sed -i "s@http://.*security.ubuntu.com@https://mirrors.tuna.tsinghua.edu.cn@g" /etc/apt/sources.list
sudo apt update && sudo apt full-upgrade
方式二 配置文件替换
sudo cp /etc/apt/sources.list /etc/apt/sources.list.bak

    echo "正在替换为清华源..."
    cat << EOF | sudo tee /etc/apt/sources.list
# 默认注释了源码镜像以提高 apt update 速度,如有需要可自行取消注释
deb https://mirrors.tuna.tsinghua.edu.cn/ubuntu/ jammy main restricted universe multiverse
deb-src https://mirrors.tuna.tsinghua.edu.cn/ubuntu/ jammy main restricted universe multiverse
deb https://mirrors.tuna.tsinghua.edu.cn/ubuntu/ jammy-updates main restricted universe multiverse
deb-src https://mirrors.tuna.tsinghua.edu.cn/ubuntu/ jammy-updates main restricted universe multiverse
deb https://mirrors.tuna.tsinghua.edu.cn/ubuntu/ jammy-backports main restricted universe multiverse
deb-src https://mirrors.tuna.tsinghua.edu.cn/ubuntu/ jammy-backports main restricted universe multiverse

# 以下安全更新软件源包含了官方源与镜像站配置,如有需要可自行修改注释切换
deb https://mirrors.tuna.tsinghua.edu.cn/ubuntu/ jammy-security main restricted universe multiverse
deb-src https://mirrors.tuna.tsinghua.edu.cn/ubuntu/ jammy-security main restricted universe multiverse

# 预发布软件源,不建议启用
# deb https://mirrors.tuna.tsinghua.edu.cn/ubuntu/ jammy-proposed main restricted universe multiverse
# deb-src https://mirrors.tuna.tsinghua.edu.cn/ubuntu/ jammy-proposed main restricted universe multiverse
EOF

    echo "更新..."
    sudo apt-get update